LUKE URITESCU
Metal Havoc Release 1: Project Impact
This page is dedicated to the contributions I made for the first release of the game Metal Havoc
Enemy AI Behavior
I was put in charge of implementing AI behavior for the enemies. For this type of game, I needed to make sure the AI did not act on randomness, and instead was scripted. The method I chose for dictating the AI behavior was to use a Finite State Machine. The AI will transition from states depending on the rules I have set placed in the code. Once the AI transitions to a state, there are events which will be triggered to check if the rules for that state are being met.
Here is a quick video showing the enemy changing states. It will start in idle, go to the chase state. Once it reaches a specific distance and is allowed to attack then it will attack the player. Once it attacks the player it will transition to a recovering period in the idle state. After that recovery, it is able to attack again. The enemy will keep cycling through attack and idle state until the player kills it.
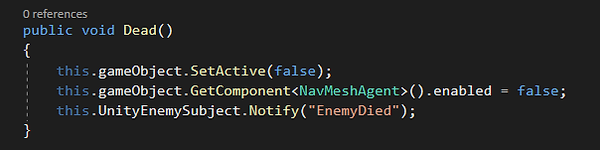
One of the complications I ran into was that enemies were meant to attack in order. I needed the enemies to attack one at a time. My solution involved putting all the enemies for a specific fight into a list. This is where I also implemented the Observer pattern, where the Enemies are the subjects and the IndiviudalCheckPoint script is the observer. Whenever an enemy died it would notify all observers.
When the IndiviudalCheckPoint was notified it would then run a bubble sort algorithm to reorganize the list. All inactive enemy objects would be sorted to the end of the list. This creates quicker searches for list of enemies since all the active enemies will be closer to the front of the list.
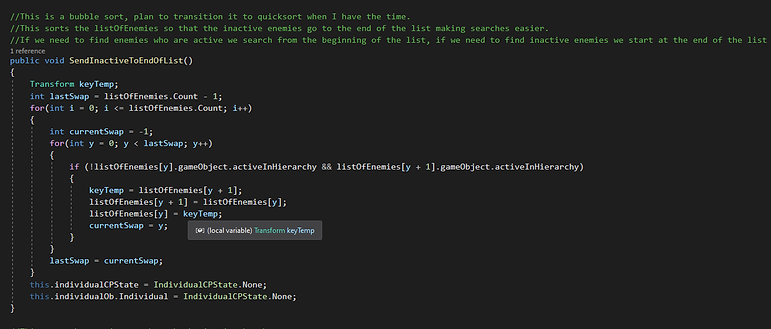
Once this sort was completed, there was a method that would make the first active enemy in the list be able to attack. Only one enemy at a time is able to attack. This AI is not finished, and there are adjustments I wish to make. The main one being to transfer all of this over to timelines completely. Lightgun games are heavy on the cinematics, and timelines are going to help us get the best results.
Pathfinding
Whenever I am working on things that are going to be tools to help the designers build levels, my goal is to make the process as easy as possible. I want to make sure I do all the backend work so that the designers don't have to worry about writing any code. For the Pathfinding I made it as simple as possible. The checkpoints are prefab objects which can be dragged and dropped onto the scene.

The designer has to drag or duplicate the CheckPoint prefab and make sure it is a child of the CheckPoints parent prefab. Once that is done the scripts attached will do most of the work

This is showing the IndividualCheckPoint script which is apart of the CheckPoint prefab. The only thing to do here, is to adjust the Condition state, and Individual Movement State. These two options allow the designer to decide what happens when the player reaches the specific checkpoint.
The player will go to these checkpoints based on the order presented in the hierarchy(first being the top checkpoint).
In this video here, the green wire spheres signify the checkpoints. The checkpoints have different conditions such as waiting for a set amount of time, having to kill all the enemies before moving on, or just being allowed to proceed to the next point. The path finding and avoidance of obstacles is by using Unity's Navmesh agent
Damage System and Enemy Variation
I was tasked with creating a way in which the Player and Enemy can take damage. I chose to use the Strategy pattern for three main reasons
1. It will reduce repetitive code
2. It makes accessing damageable objects easier
3. Will allow for easy implementation of new enemy types in the future.

I started this pattern off with creating an Interface called: IDamageable, This creates an interface where all classes that inherit from it will have two properties: CurrentHP and MaxHP. It also will have a method called TakeDamage. I then created an abstract class called: Hostile which can also deal damage; this class inherits from the IDamageable interface. The player and enemy will be a subclass of the Hostile class. Now the player and Enemy have the ability to take damage, and deal damage. If I didn't use this pattern, I would have to recreate all the properties and methods in IDamageable and Hostile for both the Player and Enemy. I would also have to do it for every type of enemy we wish to make.
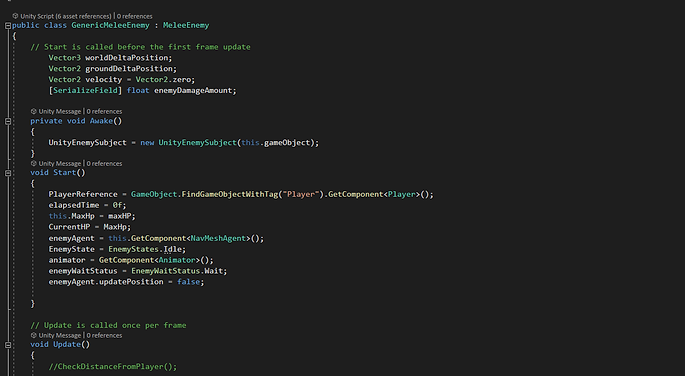
From here I started creating a system for the enemies. All enemy scripts will inherit from the abstract Enemy class. The goal here was to future proof our development. I knew we would eventually want to add multiple kinds of enemies. By using this pattern the Metal Havoc team can implement new kinds of enemies without needing to change any code. For example: GenericMeleeEnemy is of Type MeleeEnemy which is of type Enemy.
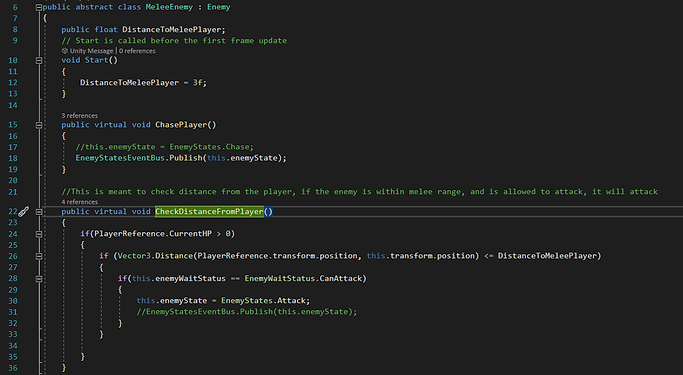


Since GenericMeleeEnemy is of type Enemy. When I check to see what the raycast has hit, all I have to do is check to see if that object is of type Enemy.
Without this pattern, I would have to add a new if statement each time the team wants to create a new kind of enemy. This would quickly clutter the code, and also complicate things.
HurtBoxes
There were two major issues when playtesting before the first release. One of the issues when playtesting before the first release was that the hit detection was not accurate. The detection was based off of a capsule collider. This meant if the enemy model was moving outside of the collider and the player shot at that part of the model it would not register as a hit. To combat this I thought about implementing hurtboxes for the enemy models.
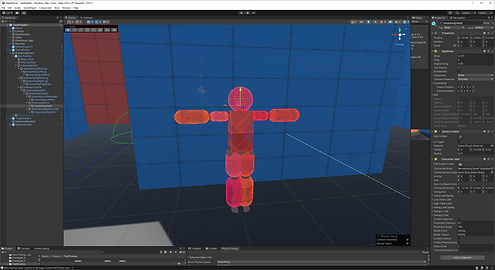
This picture here shows the colliders that have been made by using Unity Ragdoll creator. These colliders are adjusted to fit the model better. This now creates a more accurate hit detection.
This is a quick video showing how the user is able to shoot at different parts of the enemy and it will detect as a hit. Solving the first issue of inaccurate hit detection.
The Second issue was that the enemy would play the stunned animation regardless of the location it was shot. This meant the player could put the enemy in a stun lock removing any sense of danger. To combat this, I created a tag titled "head" for the sphere collider that is representing of the head. Then I put in code
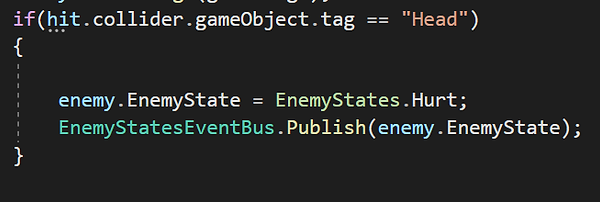
Now the enemy will only play the hurt animation if it has been shot in the head, thus solving the second issue because in order to stop the enemy from attacking the player must have good enough aim to shoot the head. This is just the beginning of what is possible now with the hurtboxes. The idea of Weakpoints is now available, and the ability to destroy parts of the enemy as well.